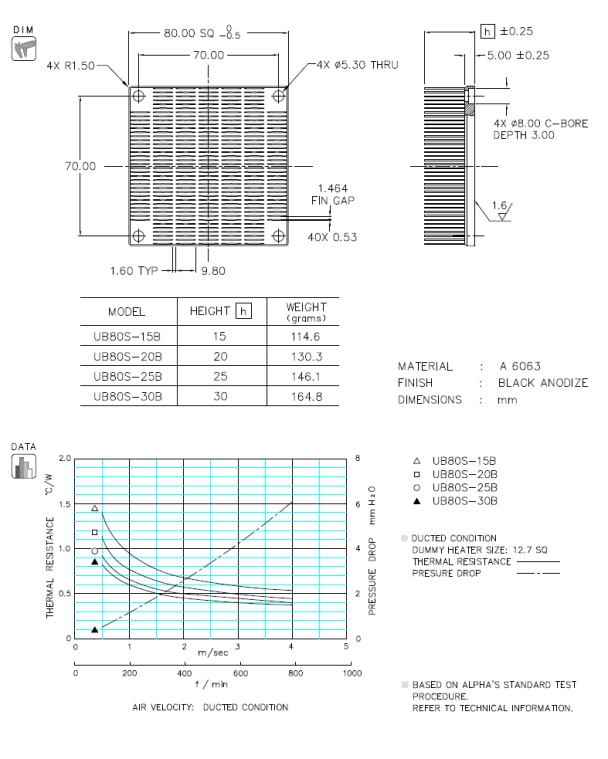
UB80S SPECIFICATION & THERMAL DATA
Model Name :
UB80S-
{{boxModelName.HSHEIGHT}}
B
-
{{boxModelName.SS}}
{{boxModelName.SPR}}
{{boxModelName.TIM}}
Step 1:
Select Heat Sink Height
Step 2:
Select shoulder screw and spring
Step 3:
Select TIM
| Heat Sink Height (h) | |
|---|---|
| Shoulder Screws | Springs | |
|---|---|---|
| {{INP.SSNAME}} | {{INP.SPRNO}} | |
| Thermal Interface |
|---|
|
|
Note
The thermal interface materials listed here are phase change materials (PCMs).
These PCMs are naturally tacky and will be pre-applied to the heat sink. However, PCMs may peel-off from the heat sink base when removing the release liner prior to heat sink installation. Since PCMs rely on their natural tackiness instead of an adhesive, this can happen.
In light of this, we recommend that our customers apply additional pressure to the PCMs prior to removing the protective liner to allow the PCMs to wet out on the heat sink surface (refer to instruction item #4 below).
- To order individual components, such as shoulder screws or springs, please visit each link/page.
-
If heatsink customization (size, hole layout, etc...) is required, we recommend using the .
MOQ is 1 piece, typical lead time is 1-2weeks.
Shoulder screw and spring selected condition(Units: mm)
Chip Height
Chip Contact Area
x
Package Size
x
PCB Thickness
Attachment Method
Distance
PCB Hole Diameter
Height Limit
Allowable Load (N)(kgf)(lbf)
Min
Max
Working Load (N)(kgf)(lbf)
Pressure (N/mm2)(kgf/cm2)(psi)
Thread Protrusion(T.P.)
Contact | © 2016 Alpha Company Ltd.


